Brief Overview
Getting a robot to learn based on its interactions with environment is one of the most powerful ideas of all. Mostly of our object manipulation revolves around the rigid body assumption. But in this project, I implemented a work that enables the robot to learn to tie a knot purely based on interacting with its environment. This a self supervised deep learning technique applied to the reinforcement learning problem of learning an effective policy. This work was based on the work on
zero shot visual imitation by researchers from UC, Berkley.
Problem Setup
The most fundamental aspect of solving this problem can be formulated as a pick and place action. A complex action such a tying a knot can be decomposed by a few such pick and place actions. Such an action is parameterized by four quantities-The action position in pixel space (x, y), the angle of the action (theta) in the world space and the length of the action in the world space. Thus the objective in this problem is to to learn a policy \(\pi(I_1, I_2)\), where \(\pi\) is a function that predicts the actions that transforms the present state (Image \(I_1\)) to a goal state (Image \(I_2\)). This problem is formulated as a deep learning classification problem that predicts a class label for each action based on the input image and a goal image. It must be noted that the choice of a classification network instead of regression means that we are discretizing the output actions. For predicting continuous actions, a regression network is more ideal but the choice of classification network makes this learning feasible, which didn't seem to converge with a regression network. The network used in the work is shown below
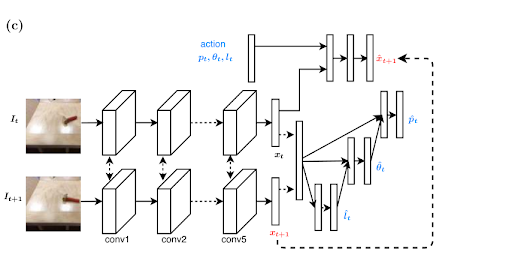
The above network minimizes two objectives- The forward loss and the inverse loss. The forward function predicts the next state given the present state and an action to be applied while the inverse function predicts the action that transforms the present state to a goal state (The present state and the goal state are represented through images). This network is built from a Alexnet base - the first 5 convolutional layer structures and the initialisation of weights for these layers are taken from the Alexnet architectures while the fully connected layers are are modified to fit the specific problem. While this network can predict small actions between nearby states, it cannot predict the sequences of actions that leads to tying a knot for example. To accomplish a complex task, a demo is first given to the machine and the complex action is thus decomposed into a sequence of images, where every pair of images is not too far away in terms of states. The system can then predict the action that leads to every sequential image in the demo that was shown thereby predicting a sequence of actions that accomplishing the complex know tying task.
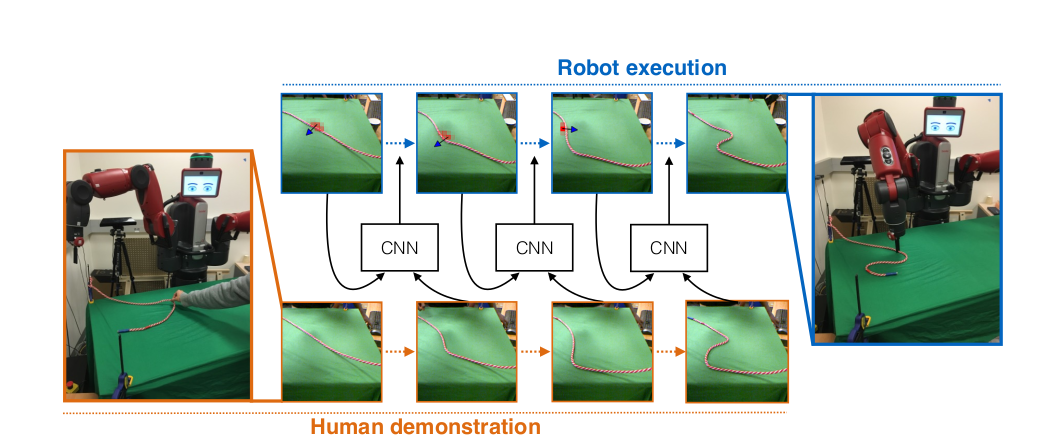
But action predictions are not always correct. Sometimes wrong actions are predicted and hence, to handle such wrong predictions, a goal recogniser network is constructed. The goal recognizer is a simple binary classification network, that given two images, predicts if both of them belong to the same state. This network is constructed with the same Alexnet base but with only one neuron at the final fully connected layer. Thus this network is used after every applied action to check if the state has reached the next intermediate goal state in the sequence and the intermediate goal state is switched to the next intermediate goal if the network output is positive.
Automation and Debugging tools
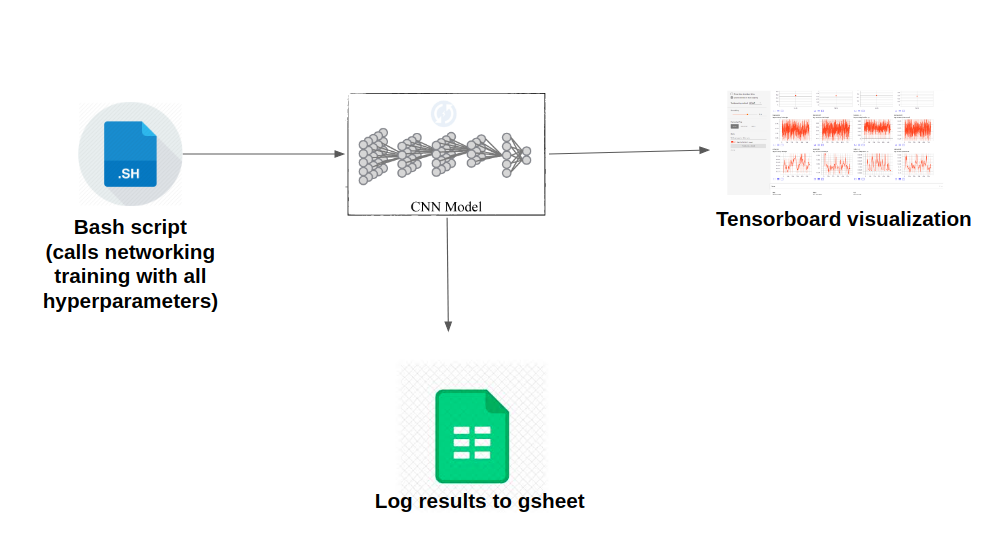
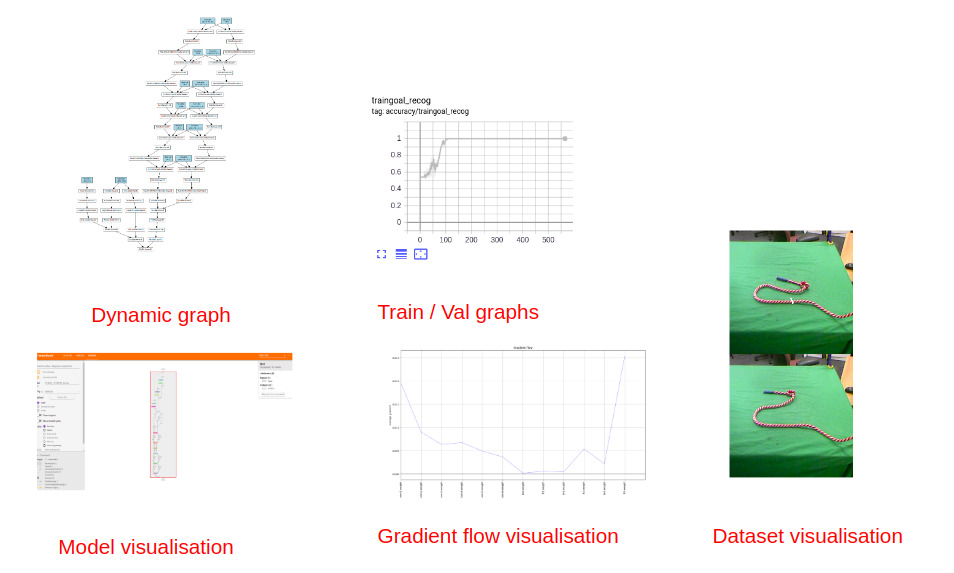
One of the most important things when trying to train neural networks is to automate as much as possible so that a lot of experiments could be run for tuning the parameters. Another important aspect is to build visualization tools that will greatly aid in network debugging. Without these tools, it will be a nightmare to debug neural network when something goes wrong. The figure below shows the pipeline I used to minimise manual work so that I could run a lot fo experiments with very minimal work. A bash script contains a lot of scheduled experiments along with their hyper parameters. This script calls the training code, which after training for a predefined number of epochs logs results to an online gsheet. The program also logs results and debugging data into a directory, which can be visualized using tensor board.
The following figure shows some of the visualization tools that were integrated to help debug the model construction and training process.
Training results and visualisation
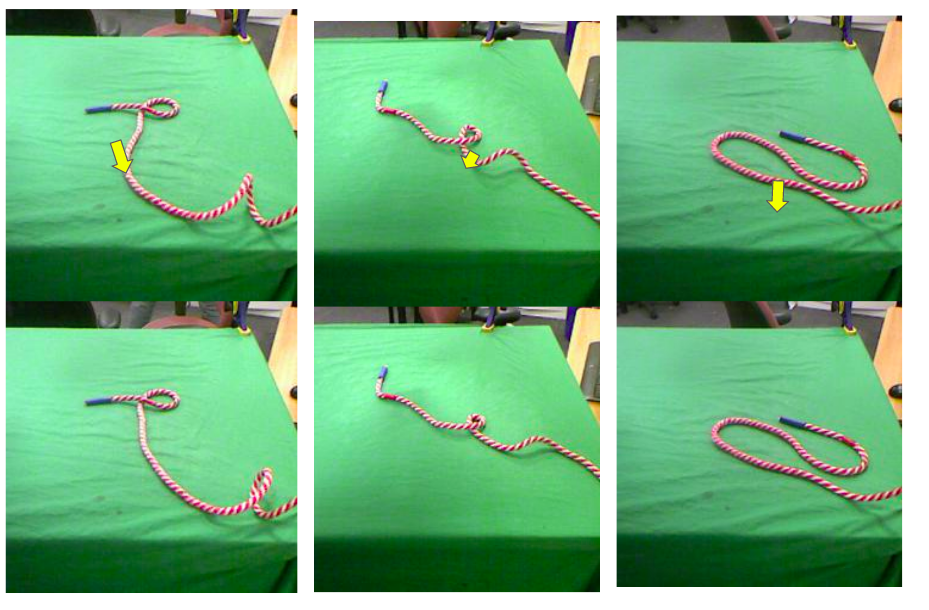
Training the model in one shot is difficult and makes it difficult to converge. In order to facilitate the training process, first the network is trained with the inverse objective alone and then the converged network is trained again with the joint objective of both the forward and inverse loss. Among 100s of experiments a sample of few best results are shown below.

It must be noted here that the accuracy metric used here is not a very accurate measure for the task at hand since multiple actions could lead to the same state. Nevertheless, this serves as a proof that the model has learned something useful.A visualization of the model's prediction is given below, where the yellow arrow indicates that action (the x,y pixel location to pick, the angle at which to pick up and the distance to move in the direction) so that the state can be changed from the given state (image at the top) to a goal image(image at the bottom)
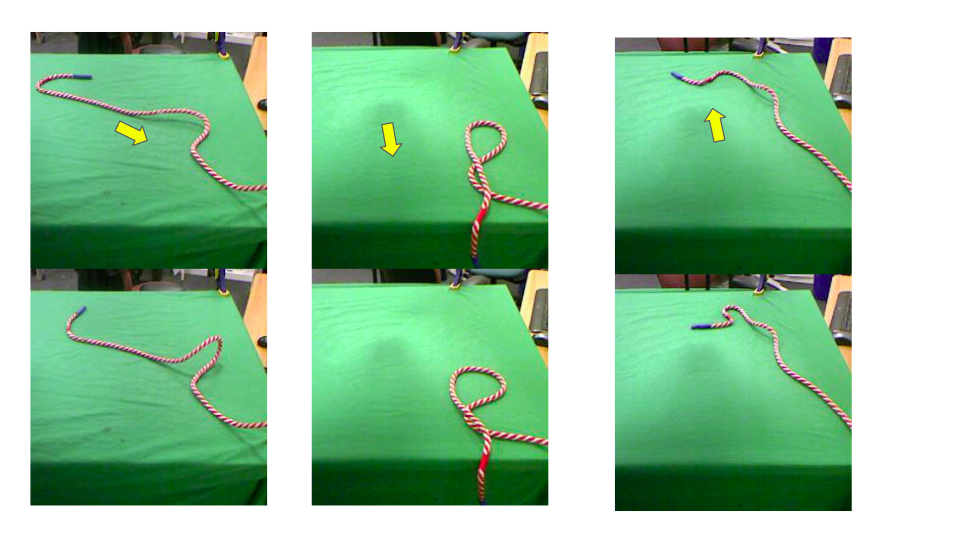
It must be noted that these are a few cherry picked results and there exists a lot of bad results as shown below
Hardware Implementation(In progress)
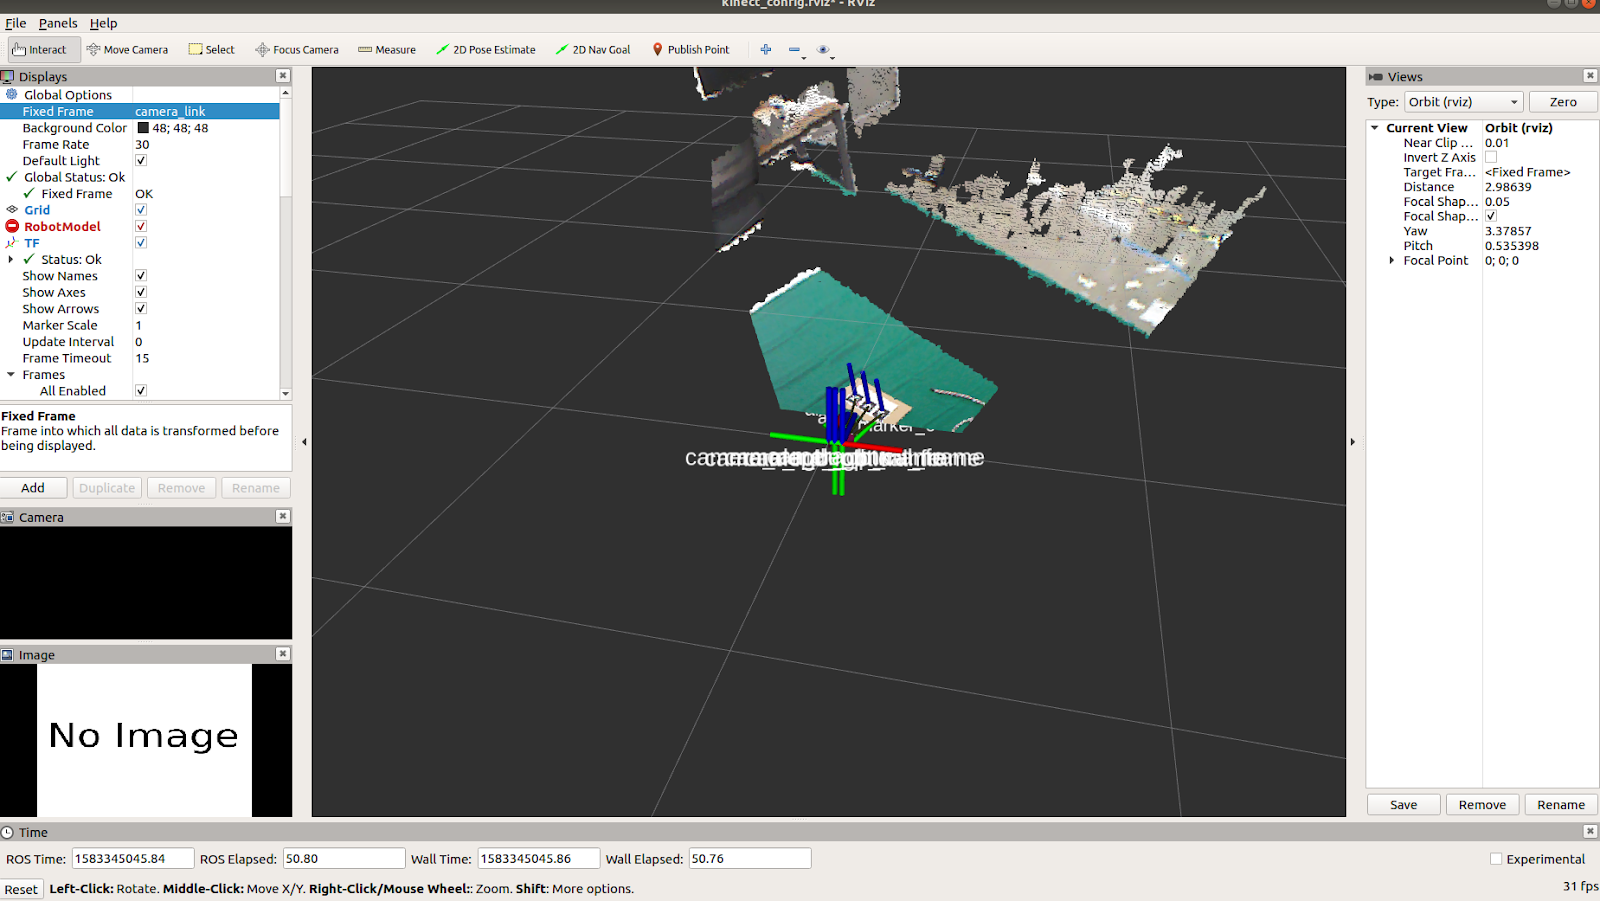
A kinect camera is used so that the depth corresponding to any x,y pixel location can be directly obtained. First the relative transformation between baxter and kinect is calculated using a AR tag that is visible in both the kinect camera and baxter's camera as shown below.
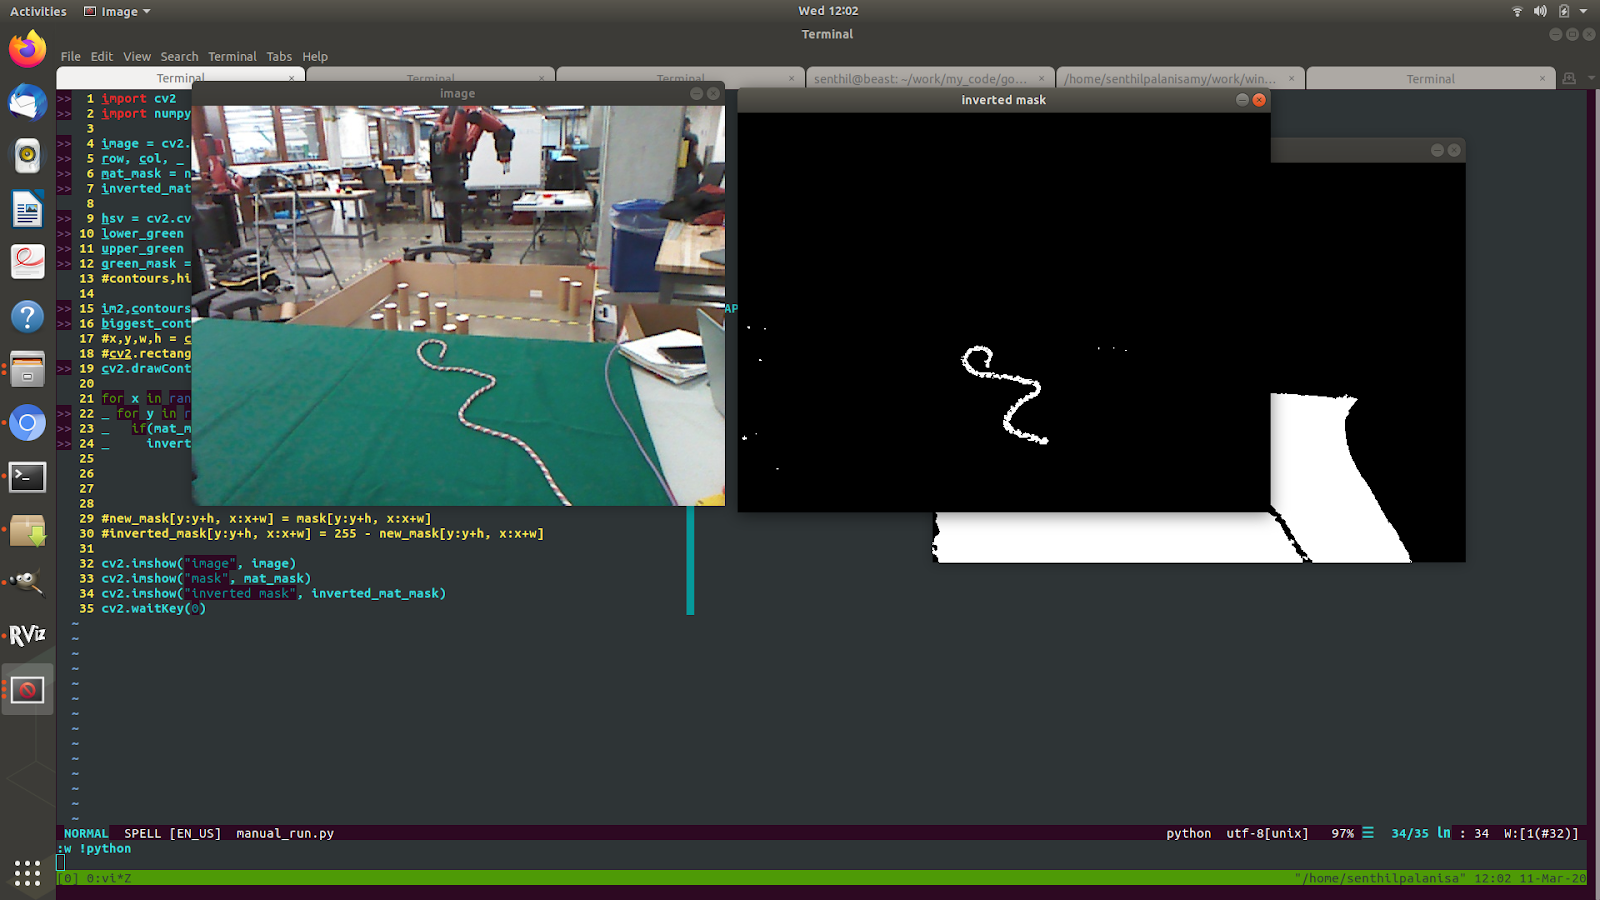
Next a simple computer vision code was written using masking and connected component analysis to find the rope. Though the network's prediction directly gives out the pixel locations to execute the action, this step is done so that the action can be slightly adjustment if a prediction is given in a pixel location very close to rope but outside the rope.
The code for this project can be found at
this github repo. Practical tips for debugging neural networks can be found in
this blog